In this quick tutorial, we’ll cover how to launch an AppImage file like you would a normal desktop application on Ubuntu (versions >= 22.04).
Why Use an AppImage File?
You might use an AppImage version of a piece of software for a few reasons:
- The developer has only made it available in this format.
- The AppImage provided by the developer is either more stable or up-to-date than the version provided by your distribution’s software centre.
- You want a completely portable executable file that doesn’t need to be installed on your system.
For me, the reason is usually the second one. In fact this happened only recently when I installed ClipGrab from the Ubuntu Software Centre; the AppImage provided by clipgrab.org turned out to be faster and far more stable, so in this tutorial I’ll use ClipGrab as the example application.
Step 1: Download it and Make it Executable
First, you need to download the AppImage file from the developer’s website. If you’ve stumbled across this blog, I’ll assume you’ve done this already.
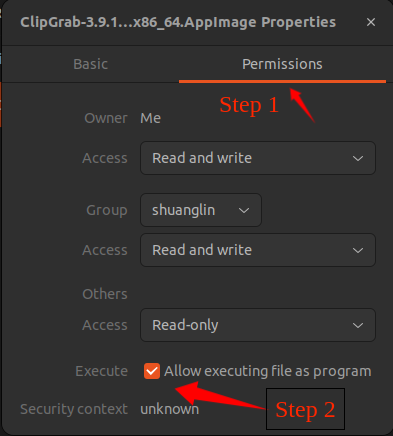
Once it’s downloaded, you need to change the file’s permissions so as to make it executable. You can do this in one of two ways: by right-clicking it, selecting Properties , and then in the Permissions tab checking the box that says Allow executing file as a program , as shown in Figure 1.

The other way is via the command line:
chmod -x ClipGrab-xxx.AppImageIn some versions of Linux, you might be able to double-click it and it should just boot up. However, if you’re on Ubuntu version 22.04 or above, it’s likely nothing will happen when you do this.
Attempting to run it from the command line should tell us the problem:
~/Downloads$ ./ClipGrab-xxx.AppImage

dlopen(): error loading libfuse.so.2

AppImages require FUSE to run.
You might still be able to extract the contents of this AppImage if you run it
with the --appimage-extract option.
As you can see we’re missing a dependency called libfuse.so.2, which Ubuntu no longer includes by default. To install this, run:
sudo add-apt-repository universe
sudo apt install libfuse2
However, I’m not too interested in running the AppImage file directly in this manner; what I want to do is extract its contents.
Step 2: Extract the AppImage
So, why would you extract an AppImage? Boot speed is one benefit; the application should start faster if you extract it. The other plus is that it makes it easier to set it up like a normal desktop application, with its own sidebar shortcut.
To extract the AppImage, run the following command (from the location you’ve saved the file to – most likely the Downloads folder):
./ClipGrab-xxx.AppImage --appimage-extractThis will create a new folder called squashfs-root , and if you browse its contents, you should see a file called AppRun and (hopefully) the application’s icon saved as either a .png or .svg file. The icon is what we’ll eventually be clicking on from our sidebar, so if you don’t see an icon here, try to find one online.
Next, move the squashfs-root folder the /opt directory. In Linux the /opt directory is generally where add-ons or software that doesn’t conform to typical installation methods are stored (the latter describes our case). You’ll likely be prevented from copying and pasting the folder due to permission restrictions, so it’s best to do this from the command line. While we’re at it we’ll rename the folder to the actual application name. Ensuring you’re in the right directory (cd to it if not) run the following command, substituting in the name of your application:
sudo mv squashfs-root /opt/clipgrabStep 3: Create a Desktop Application Entry
Now that we have our application where we want it, we need to create a desktop entry for it. These are generally stored in /usr/share/applications , where you should see plenty of other .desktop files already. These can be opened in any text editor if you want to get a feel for the format.
Move to your home or root directory and create the file as follows:
cd ~ && touch clipgrab.desktopOpen it with any text editor and create entries similar to the below. How do you know what values to use? Often when you extract the AppImage, there will be an example .desktop file you can consult, as is the case with ClipGrab. I didn’t copy and paste it as-is as it was far too verbose; I just took the bits I needed and edited the rest. Of particular importance is the file path for the Exec entry.
[Desktop Entry]
Name=ClipGrab
Type=Application
Categories=Graphics;
MimeType=image/png;
Exec=/opt/clipgrab/AppRun %F
Icon=/opt/clipgrab/clipgrab.png
Terminal=false
StartupNotify=true
Step 4: Install and Add to Application Favourites
The final step is to install the file we created using the desktop-file-install command. This is better than simply copying the pasting the file to the /usr/share/applications directory as the file will be validated in the process and the application cache will be refreshed.
sudo desktop-file-install clipgrab.desktopNow when you check your list of applications you should see your application listed, after which you can simply right-click it to add it to your favourites sidebar. It’s safe now to delete the original .desktop file.
And that’s it! I hope you found this helpful.
Additionally
If you meet yt-dlp error, you can download this support file from https://github.com/yt-dlp/yt-dlp?tab=readme-ov-file#release-files, chose the first file, and then copy it to ~/.local/share/Clipgrab/Clipgrab/.
本文共 0 个字数,平均阅读时长 ≈ 0分钟


评论 (0)